Technology
A hand-made computer from the PIC24fj64gb002
1. Introduction
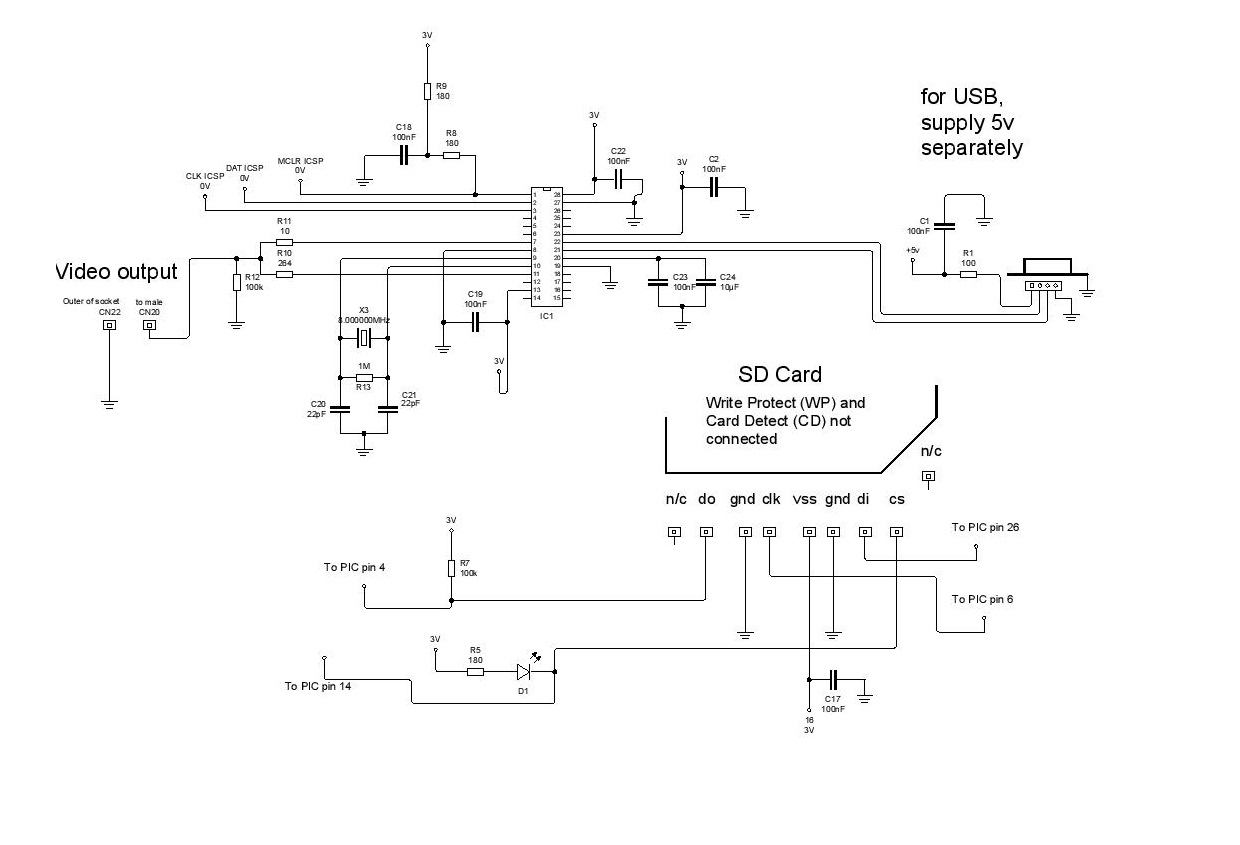
1.1 This project represents a handmade computer with a PIC24fj64gb002 at the centre. Firmware is provided as text files, as source files and header files.
1.2 Straight off the bat, here is the schematic and a photograph.


2. Downloads
2.1 Firmware (zip)
2.2 Schematic (pdf)
Download the schematic
3 Notes for building this design
With this project I provide no exhaustive set of notes. See the project page for the Handmade Computer based on the PIC24fj256 for more detail.
1 Handmade computer on the PIC24fj256gb110
3.1 I built this design with two purposes: to free up my Explorer 16, which had been tied to the PIC24fj256gb110 project; and, to allow the use of a DIP package PIC, so that I would not need to go to the trouble of gettnig a PCB made. In the past, I have used Microchip's plug-in modules with 100 pin footprint smd chips without a special PCB board, but this was very labour intensive. Besides, I wanted to see the little 28 pin device doing something a bit special.
4 The Circuit
4.1 The PIC24f has a lot of extra capacitors and vcc/vss pins. These are shown in the appropriate datasheet. However, they are also shown on my schematic.
4.2 An 8MHz crystal is used.
4.3 ICSP lines are shown. I debug my code using the screen, and repeatedly burn the firmware in to make alterations on the go. No idea if this is usual.
5 Firmware
5.1 As supplied here, the firmware is working fine on my machine. It is important that you go to the linker settings in Program Properties on the MPLAB IDE, and give the heap at least 800, and the stack at least 10.
5.2 The code takes up 97% of the Program Memory as compiled by the free version of the IDE.
5.3 Regarding SD Card functions, almost all of them are turned off. It is possible to read files on the SD Card via the screen (when you plug a composite video lead in). It is not possible to allow the SD Card FATfs code to do anything else due to limitations on Program memory. You will find the FATfs setup details in the ffconfig.h file, where it is possible to turn on or off SD Card functions. With this chip, you can't do much.
5.4 You may need to include the FAT directory with the xc16 compiler gcc pathway.
5.5 I advise, with a project like this, first getting the screen working, the text.c module sets the screen up, along with text.h, font.h, and a couple of others.
5.5.1 Then, when you can burn firmware with some built in characters sent to the screen and they display, move on to the USB keyboard.
5.5.2 As with the 256 version, you can write direct to the screen with some small modules which I wrote for capturing the inputs from USB, which do not use the UART. They replace the typical gets() type functions.
5.5.3 Finally move onto the SD Card. My files should handle the SD FATfs side of things, but if you use it for yourself, use the MCC on Microchip MPLAB; ensure you get SPI Master from the Foundation Library, and an SPI driver. I have used SPI2. Set up the configuration for XT timer, PLL on Div 2.
6 Applications
6.1 With a screen and a keyboard, and an ICD 4 plugged in for regular loading up of experimental firmware, I intend to do some C language testing of the Artificial Intelligence kind.. things you may do more conveniently on a PC, I suppose. But what are embedded designs for anyway? I like getting as close to the metal as I can, and having the option, one day, of making a completely mobile and independent thing, not reliant on a big PC, or one of those disgusting mobile phones which ruin people's lives in this age.
But you can see some practical application in a project further on, which tests out Herbert Schild's 'Artificial Intelligence using C'. Obviously, I removed the SD Card functionality for this, releasing about 50% of the program and data memory for use in that way.
Here's how I used the Plug In Module (PIM) to do some prototyping, as mentioned above.

18. Copyright, Jason Powell, March 2020
Design Jason Powell, 2020.